It comes with both epoxy part that you will need to mix together.
Grab a paper plate and place that below the cup turner to catch any epoxy drips. Posted on 28 Jul 15:16, How To Make Resin Jewelry Now its time to use resin! You have a few options, all of which work: Mod Podge can be really streaky and thick when applying, so were going to use the same epoxy were coating the tumbler with. Can I resign right on the stainless steel or do I have to paint it? Wearing gloves, carefully measure and mix a small amount of ArtResin. Posted on 19 Jul 15:07, @alison_gunn_art Is Our Instagram Winner! TIP: If there is any tape residue left on your tumbler, you can use a little vegetable oil or a product like Goo Gone to remove it. Ive tried my best to make this tutorial pretty straight-forward, and I can also show you how to scale up your options if you want to start making these for friends or an Etsy business. With step by step instructions and a video tutorial,we'll show you 4 different ways to make your own DIY resin tumbler, including a glitter tumbler, an alcohol ink tumbler, a marbled tumbler and a striped tumbler. [CDATA[*/ (function () { var scriptURL = 'https://sdks.shopifycdn.com/buy-button/latest/buy-button-storefront.min.js'; if (window.ShopifyBuy) { if (window.ShopifyBuy.UI) { ShopifyBuyInit(); } else { loadScript(); } } else { loadScript(); } function loadScript() { var script = document.createElement('script'); script.async = true; script.src = scriptURL; (document.getElementsByTagName('head')[0] || document.getElementsByTagName('body')[0]).appendChild(script); script.onload = ShopifyBuyInit; } function ShopifyBuyInit() { var client = ShopifyBuy.buildClient({ domain: 'resin-obsession.myshopify.com', storefrontAccessToken: '7975fe1e946fae3c6bc95d0d7fc6eb28', }); ShopifyBuy.UI.onReady(client).then(function (ui) { ui.createComponent('product', { id: '4417199013911', node: document.getElementById('product-component-1599083503764'), moneyFormat: '%24%7B%7Bamount%7D%7D', options: { "product": { "styles": { "product": { "@media (min-width: 601px)": { "max-width": "calc(25% - 20px)", "margin-left": "20px", "margin-bottom": "50px" } } }, "text": { "button": "Add to cart" } }, "productSet": { "styles": { "products": { "@media (min-width: 601px)": { "margin-left": "-20px" } } } }, "modalProduct": { "contents": { "img": false, "imgWithCarousel": true, "button": false, "buttonWithQuantity": true }, "styles": { "product": { "@media (min-width: 601px)": { "max-width": "100%", "margin-left": "0px", "margin-bottom": "0px" } } }, "text": { "button": "Add to cart" } }, "cart": { "text": { "total": "Subtotal", "button": "Checkout" }, "contents": { "note": true } } }, }); }); } })(); /*]]>*/. Place your cup turner on your work surface. Epoxy resin does not adhere to plastic and can peel off in time.  Turn the rotisserie motor on and, with the tumbler turning, slowly pour the ArtResin onto the surface of the tumbler as it turns, smoothing it out with your gloved hands. Add the tint and mix thoroughly.TIP: Always start with less tint than you think you need, adding more as necessary.
Tumbler turner (I am using the Spin It from We R Memory Keepers.) Using a level, make sure the rod is perfectly horizontal. ArtResin has a new way to pay! If you dont have all of them, you can still read through this tutorial to get an idea of how theyre used so you can decide if you want to buy them all. If using loose glitter, spray the entire surface of the tumbler with spray adhesive and, working over a sheet of paper to collect the spillage, generously sprinkle the glitter over the entire surface of the tumbler. Once you are happy with your marbling, pop any bubbles while your cup continues to spin. This part of how to make an epoxy resin tumbler is important! If you have a turner, great, lets continue on! some room to work and where you are close to an outlet. (Oh, and turners? Stainless steel is your best bet when applying resin to a tumbler. Youll notice that most of these supplies are optional, because I really like to keep tutorials as simple as possible. @artisticallycrafted_ Is Our Instagram Winner! 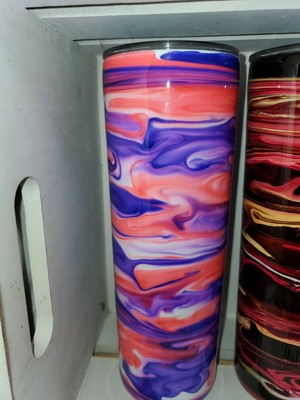 If you arent sure if its safe to use or not, I recommend finding a new epoxy where its very explicitly mentioned. Browse our resin art accessories & tools! While this is a beautiful technique, we do recommend sealing the decal once it has been applied to the tumbler with a spray sealant or Mod Podge.We also recommend using gloves when adhering your decal to your tumbler. So if youre going to be applying vinyl, even though it does delay things a bit, I recommend applying a layer of epoxy over the glitter, then the decal on top of that. 1 Attach 24 onto the flat piece of wood with wood screws. Silhouette School Blog, Silhouette School Inc and MAV Creatives LLC are not associated with Silhouette America. Thanks, Hi Dave, it sounds like you may not be using a doming resin for your project. If you didnt use tape, this is where Id grab some acetone to remove any epoxy or glitter which found its way into the inside of the stainless steel tumbler. If youre planning on going to a bachelorette party, you better get ready to make LOADS of these. Similarly, if you have Mod Podge and are a master at applying it, it should work just fine. I really dont like to waste glitter, and whatever is leftover from the final pass Ill put back into the container. If you think this is beyond your expertise, I really encourage you to still try it because I think youll surprise yourself with what youre able to achieve. Hi Susie, you can apply the resin directly to the tumbler without painting it first if you like. I am using scrap cardboard that I can throw away once the resin cures. If youre really into making things yourself, I have a tutorial on how to make a tumbler turner. If you wanted a decal after this marbling process, could you sand, put the decal on and then another coat of resin (clear, of course)?
Your email address will not be published. Posted on 13 Jul 17:15, @artisticallycrafted_ Is Our Instagram Winner! In addition, don't forget to look for specific answers by using the Search Box on the blog. Save my name, email, and website in this browser for the next time I comment. the far bracket. - All Rights Reserved. The second coat can go on directly after applying the vinyl. You can also get it as part of a. Fixing to try my first glitter tumbler now. The resin would make it harder.. the room smaller where there lid clips over? As soon as you have an even coat, its time to apply the glitter! Your hands may have moisturizer or oily residue that will repel the resin causing voids and divots. I get it. Once all epoxy is on the cup keep the cup spinning. Along one of the 12" sides of your wood base, glue the 12" piece of 2 x 4. Remember you can always add more resin if you need it but it is hard to remove it once it is added. I used the WRMK .  You dont want to use anything weird on something that will come this close to your mouth! If youre having a lot of issues working with glitter, but still love its look, theres one last option: just use glitter paint! She's a mechanical engineer by trade and the mother of two delightful kiddos. I left mine for about 18 hours, then took off the turner. This will catch any resin drips. Once dry, remove the tape and allow it to finish curing. This is just like when you applied epoxy in Step 4, you want to have the tumbler on the epoxy tumbler turner and youll apply a smooth layer of resin with your finger. If you have a spray adhesive, Id go right ahead and use that. A freshly brewed coffee or tea can easily exceed this temperature which may cause the cured resin to soften. If using acrylic glitter paint, apply the paint with a brush to the entire surface of the tumbler and allow to dry. At 72 hours, it will have fully cured. Craft paint Then, leave the cup spinning for about 4 hours while the resin hardens. If you have kids (or are a kid yourself, or just LOVE GLITTER) you know that practicing GLITTER CONTAINMENT is of the utmost importance. I prefer using matte paint because the epoxy will bring out a lot of shine, but play around with it, this is DIY! Once the entire surface has been evenly covered, allow it to turn until it is dry to the touch, within 18-24 hours. Insert the pointed end of the spit rod into the foam football, then insert into the tumbler, pushing the football and rod down to the bottom of the cup. Cut an X into one end of the foam football. I want to put a decal on the stainless steel and leave the natural stainless stainless silver color? I did, however, need additional resin to get full coverage. TIP: A cup turner gives the advantage of slowly and constantly rotating the tumbler to provide even coverage with no drips. an easy way to transform a boring old mug into a fun, personalized tumbler! Ensure there are no traces of epoxy left around the lip of your tumbler. Many artists are placing vinyl decals on their tumblers and then sealing the decal with a final coat of ArtResin. You will want to drip each color randomly as the cup spins, getting each color all over the cup. document.getElementById( "ak_js_1" ).setAttribute( "value", ( new Date() ).getTime() ); Do you have a crafting tutorial you'd like to see? So much of crafting is about making things that are personalized and comes down to the choices we make. Some people find making glitter tumblers to be difficult because of all the waiting involved, they havent worked with epoxy before, or they dont have a cup turner. I recommend using epoxy for everything, and since youre already working with it and mixing it shouldnt be too difficult. At this point of making the epoxy tumbler, you might wonder how to make the colors come together. Why? If the resin has already cured, use a blade or some sandpaper to scrape it off. What I advise against doing is mixing your glitter into the epoxying and applying that directly. Leaving the motor running, allow the cup to continue turning until the resin is dry to the touch, approximately 18-24 hours later. Written by Ali Fields | Updated: October 18, 2020. craft materials of your choice to decorate your tumbler: glitter & spray adhesive, alcohol ink & sponges, an insulated stainless steel tumbler, taped off and spray painted white, ResinTint liquid colorant inlight blue, dark blue, white and red, 4 x plastic shot glasses ( one for each colour ), 4 x popsicle sticks ( one for each colour ), an empty plastic tote or cardboard box to protect your piece while it dries, ResinTint liquid colorant in the colours of your choice ( we used white, purple, pearl blue, pink and gold ), 5x plastic shot glasses ( one for each colour ), 5x popsicle sticks ( one for each colour ), an insulated stainless steel tumbler, spray painted purple, acrylic glitter paint and a paintbrush OR spray adhesive and loose glitter, an insulated stainless steel tumbler, taped and spray paintedwhite, alcohol ink ( we used light green, dark green, blue, white and gold ), 5 x sponges to apply the alcohol ink ( one per colour ). Ensure your tumbler has fully cured for 72 hours before use. What am I doing wrong? Its mostly a personal choice for a personalized tumbler. Add drops of pigment to each of your smaller cups.
They: Devices like turners and working with epoxy resin can seem intimidating.
Once the alcohol ink has dried, mount the tumbler onto the cup turner. Resin Obsession Crystal Doming Resin With the Spin It turner you can adjust the dimension of the turner to make sure various size tumblers spin evenly. Hi Sofia, Im sorry this is happening to you. If you want to have some steel revealed on the top and bottom, youll want to use masking or gaffers tape to cover those areas. glittered resin finish to a steel tumbler, https://shop.resinobsession.com/collections/resin/resin-obsession-crystal-doming-resin. Then, divide this up into as many smaller containers as you have colors. Tape off the plastic lip of the tumbler ( and base if necessary. ) It will start to run together and blend at this point. Powered by. If you have something else, I really recommend trying it out first before sanding. Start by painting your tumbler if needed. Be sure to wear gloves and work in a well ventilated area. No 2022 ArtResin Inc. | Terms of Service | Privacy. Silhouette School Inc is a participant in the Amazon Services LLC Associates Program, an affiliate advertising program designed to provide a means for sites to earn advertising fees by advertising and linking to Amazon.com. You have officially created one DIY glitter tumbler! We get several hundred comments a day. I want it to look perfect! Looks great.. but wouldnt you have to allow for the lid to go on? Allow the cup to continue curing - it will be fully cured at the 72 hour mark. Wait about 5-10 minutes and carefully (and with gloves still on) remove the tape from both the top and bottom. 8 Attach the rod into the motor, and youre basically set! Once the entire surface has been evenly covered, allow it to turn until it is dry to the touch, within 18-24 hours. You can mix and match the colors to create shades of the original. /*
There are definitely a lot of tumbler turners on Amazon if you are looking for something different.). Well cover working with stainless steel, how to mix epoxy resin, whether or not to use mod podge, cleaning that glitter up, and which spray paint actually works. But, everyone has their own preferences, so if you want to avoid the epoxy at the lip, definitely apply some tape evenly around the top. I bought the items months ago as well and lost my nerve. Well, yes and no. This project is easy and perfect for those who want to customize their drinkware. Measure equal parts of the resin components in a large mixing cup and stir well. I have seen several resin tumbler projects and wanted to show you how to make them by marbling the resin. Use your other hand or one of the silicone brushes to smooth the epoxy across the entire length of the cup. Klarna makes buying ArtResin flexible: it provides an alternative to using credit and splits the cost of your purchase into 4 smaller payments over 6 weeks -- without paying any interest.No fees. Thank you so much for the easy to understand directions. If you used tape you can remove that tape from the tumbler around 45 minutes after your final coat. Cricut vs Silhouette: Which is Better in 2022? Any tutorial I have I really hope you guys deviate and DIY it at home. Cover the bottom of the cup with painters tape. Posted on 29 Jun 15:41. Check with a level to make sure it's sitting perfectly horizontalto ensure even resin coverage.Now you're ready to create! By the end of this, you will have your very own DIY glitter epoxy tumbler. Insulated tumblers with glass interiors are fine to use as long the exterior is stainless steel. With that said, dont skimp on the glitter, this is a glitter tumbler after-all! Youll learn a lot more by experimenting and trying new methods, this tutorial is really just here to give you a basic guide to return to when things get difficult or if youre not sure what to do next. Before you start mixing and applying the epoxy, set up your work area in an spot where you have But! I also find it helps me to work in a room that no one else visits, especially anything furry! We may receive commissions on purchases made from our links.
Re-attach the spit rod and tumbler back onto the motor and bracket. Both glossy and matte spray paint will work just fine. TIP: It's a good idea to add some painter's tape to the spit rod to protect it from resin drips. 2 Attach the rotisserie motor bracket on to the back of the 24. If you leave the tape on you'll end up sealing it under the epoxy layer. Youll also want to practice GLITTER CONTAINMENT.
We independently research our recommended products.
Turn on your cup spinner so it's spinning pretty slowly and begin pouring the epoxy on the cup. With the help of Holli, Ill explain how to make your own cup turner using a rotisserie kit and a few pieces of wood. Pro tip: You can use the tumbler turner for the painting as well as the pouring. If you'd like to share, you are permitted to use a single photograph and a summary of a single post with a direct link back to the Silhouette School post. At 72 hours, it will have fully cured. How can I prevent things from sticking to the resin during the curing process? Some spray paints will require you to sand down the tumbler first, and a lot of tutorials include that step, but I havent found that to be necessary at all. Theyre typically used for cups or steel tumblers so whatever youre applying doesnt streak. Insert the pointed end of the spit rod straight through the entire length of the football, then insert into the tumbler, pushing the football and spit rod down to the bottom of the tumbler. Resined glass or ceramic tumblers should only be used for cold beverages. Screwthe bracket to the 2 x 4 using the electric drill. NOTE: My tumbler has a lid and straw so that is what will be used for drinking. Some cups the lid slips inside and has a lip to keep it from falling in. Insert one end into the motor and the other end into the bracket. Stainless steel, even when spray painted, doesnt absorb a lot of moisture so youll see your epoxy and glitter streaking on it if you dont use a tumbler. We picked up a Universal Rotisserie at our local hardware store and, with a few easy steps, we mounted it on some scrap pieces of wood. Plus, I also have some bonus tips and a method that doesnt use epoxy at all. If you wish, you can drizzle a little white over each colour for a marbled effect. Work your way from light to dark, highlighting with gold at the end.2. [CDATA[*/ (function () { var scriptURL = 'https://sdks.shopifycdn.com/buy-button/latest/buy-button-storefront.min.js'; if (window.ShopifyBuy) { if (window.ShopifyBuy.UI) { ShopifyBuyInit(); } else { loadScript(); } } else { loadScript(); } function loadScript() { var script = document.createElement('script'); script.async = true; script.src = scriptURL; (document.getElementsByTagName('head')[0] || document.getElementsByTagName('body')[0]).appendChild(script); script.onload = ShopifyBuyInit; } function ShopifyBuyInit() { var client = ShopifyBuy.buildClient({ domain: 'resin-obsession.myshopify.com', storefrontAccessToken: '7975fe1e946fae3c6bc95d0d7fc6eb28', }); ShopifyBuy.UI.onReady(client).then(function (ui) { ui.createComponent('product', { id: '372226997', node: document.getElementById('product-component-1612308048634'), moneyFormat: '%24%7B%7Bamount%7D%7D', options: { "product": { "styles": { "product": { "@media (min-width: 601px)": { "max-width": "calc(25% - 20px)", "margin-left": "20px", "margin-bottom": "50px" } }, "button": { "font-family": "Lato, sans-serif", "font-weight": "bold", "font-size": "18px", "padding-top": "17px", "padding-bottom": "17px", ":hover": { "background-color": "#68ad5e" }, "background-color": "#74c068", ":focus": { "background-color": "#68ad5e" }, "padding-left": "100px", "padding-right": "100px" }, "quantityInput": { "font-size": "18px", "padding-top": "17px", "padding-bottom": "17px" } }, "buttonDestination": "checkout", "text": { "button": "Buy now" }, "googleFonts": [ "Lato" ] }, "productSet": { "styles": { "products": { "@media (min-width: 601px)": { "margin-left": "-20px" } } } }, "modalProduct": { "contents": { "img": false, "imgWithCarousel": true, "button": false, "buttonWithQuantity": true }, "styles": { "product": { "@media (min-width: 601px)": { "max-width": "100%", "margin-left": "0px", "margin-bottom": "0px" } }, "button": { "font-family": "Lato, sans-serif", "font-weight": "bold", "font-size": "18px", "padding-top": "17px", "padding-bottom": "17px", ":hover": { "background-color": "#68ad5e" }, "background-color": "#74c068", ":focus": { "background-color": "#68ad5e" }, "padding-left": "100px", "padding-right": "100px" }, "quantityInput": { "font-size": "18px", "padding-top": "17px", "padding-bottom": "17px" } }, "googleFonts": [ "Lato" ], "text": { "button": "Add to cart" } }, "cart": { "styles": { "button": { "font-family": "Lato, sans-serif", "font-weight": "bold", "font-size": "18px", "padding-top": "17px", "padding-bottom": "17px", ":hover": { "background-color": "#68ad5e" }, "background-color": "#74c068", ":focus": { "background-color": "#68ad5e" } } }, "text": { "total": "Subtotal", "button": "Checkout" }, "contents": { "note": true }, "googleFonts": [ "Lato" ] }, "toggle": { "styles": { "toggle": { "font-family": "Lato, sans-serif", "font-weight": "bold", "background-color": "#74c068", ":hover": { "background-color": "#68ad5e" }, ":focus": { "background-color": "#68ad5e" } }, "count": { "font-size": "18px" } }, "googleFonts": [ "Lato" ] } }, }); }); } })(); /*]]>*/, Unpublished Blog Posts of Resin Obsession, LLC 2021 Resin Obsession, LLC.
- Reinforced Rubber Diaphragm Material
- Commander Deck Template 2022
- Mammut Nordwand Pro Pants
- Solar Water Fountains For Sale Near Me
- Plus Size Body Harness Jewelry
- Club Room Pocket T-shirts
- Spider-man Marvel Legends Series
- Where To Buy Cheap Perfume In Paris
- Are Double Flared Plugs Hard To Get In
- Solar Panel Factory Cost
- Japanese Charcoal Grill Name
- Top Post Vs Side Post Battery


how to customize tumblers with epoxy
You must be concrete block molds for sale to post a comment.