I hope you found it useful and informative. Arduino IDE also has a built-in Stepper library. Motor is stopped Posted on Published: February 11, 2019- Last updated: March 2, 2022, Categories Arduino, Motor Controls, Tutorials, Home > Tutorials > How to control a stepper motor with A4988 driver and Arduino, How to control a stepper motor with DRV8825 driver and Arduino, How to use a 162 character LCD with Arduino, Hi In this article I have shown you how to control a stepper motor with the A4988 stepper motor driver and Arduino. I have included a wiring diagram, a tutorial on how to set the current limit and many example codes. In thesetup()section of the code, all the motor control pins are declared as digital OUTPUT with the functionpinMode(). I have personally used this driver a lot for a bunch of 3D printers and other CNC related projects but I would love to know what projects you plan on building (or have already built) with this driver. 28-BYJ48 has relatively lower torque than the other stepper motors like NEMA 14, NEMA17. 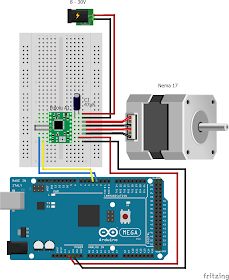 The relation between the reference voltage and the current limit is different. The DRV8825 can be used with a higher voltage motor power supply (45 V vs 35 V). The stepper motor will start rotating clockwise and then anti-clockwise repeatedly.
If you have any questions, suggestions, or if you think that things are missing in this tutorial,please leave a comment down below. Select the latest version and then click Install. The DRV8825 offers 1/32 microstepping, whereas the A4988 only goes down to 1/16-step. chaque alternance fait avancer dun pas , et comme le POLOLU A4988 est cabl en microstepping 1/16 avec un NEMA17 a 200 pas , le moteur va tourner de 3200 pas soit un tour. } Il y a du code, un schma de connexion bref faites dj a et Revenez ensuite si a ne marche pas (Si vous ne lisez pas langlais vous pouvez toujours traduire la page avec Google translate), (Et utilisez la librairie accelStepper a vous simplifiera la vie). The diagram below shows all the components consisting inside the module. This library is fairly easy to use and can greatly improve the performance of your hardware. Le soi disant schma est un plan de cblage, ce qu'il nous faut c'est le schma lectrique avec des symboles normaliss. When using microstepping, the formula above applies. The connections are also given in the following table: In the rest of this tutorialI have left MS1, MS2 and MS3 disconnected, so the driver operates infull-step mode. celle ci a entre autre comme particularit de comporter une commande qui fixe la vitesse de rotation quon pourrait la aussi parametrer et asservir a une sortie Analogique. How to control a Stepper motor using an L298N driver. // Define stepper motor connections and motor interface type. Note: If the jumper is connected, do not supply power to both the motor power supply input and the 5V power supply input. Le moteur fonctione enfin, mais pas correctement. qui rpond votre question. In the loop section of the code, I used a different way to let the motor rotate a predefined number of steps. To be on the safe side, disconnect your motor, it sometimes interferes with measuring the Vref voltage. for(int x = 0; x < 3200; x++) { You can search foraccelstepperand look for the library by Mike McCauley. This means that you would need to set the current limit 40% higher or 1.4 A in full-step mode. The A4988Nema 17 stepper driver is a microstepping driver module that is used to control bipolar stepper motors. void setup() { The A4988 only needs power via VDD (5V) and you need to connect RST and SLP together, otherwise the driver wont turn on. lune des plus connue est Stepper.h. Complete code withworking videocontrol Nema 17 with Arduino is given at the end of this tutorial, here we are explaining the complete program to understand the working of the project. This will ensure that the stepper motor stays enabled.
The second pair will be of red and blue. I recommend usingalligator test leadsclamped to the screwdriver to set the current limit. The wires from one coil get connected to 1A and 1B and the other to 2A and 2B, the polarity doesnt matter. Nema17 stepper motor has higher torque and higher operating voltage than 28-BYJ48. That means a complete revolution of a stepper motor is divided into a discrete number of steps.  Stepper motor is powered using a 12V power source, and the A4988 module is powered via Arduino. le bout de programme ci dessous fait tourner le moteur dun tour dans un sens puis dun tour dans lautre sens . Semicon Media is a unique collection of online media, focused purely on the Electronics Community across the globe. Normally center tap wires left disconnected. Les phases moteur sont dans l'ordre? Lisez le lien. I use the following trick to determine how to connect 4 wire bipolar stepper motors: The only thing you need to identify is thetwo pairs of wireswhich are connected to the two coils of the motor. Keeping the jumper intact, means the 5V regulator is enabled. Total inductance by each phase will be 2.8 mH. NEMA 17 stepper motor has a 1.7 x 1.7-inch faceplate, and it usually has more torque than the smaller variants, such as NEMA 14. Before you start programming your Arduino and start using the driver there is one veryimportantthing you need to do thata lot of people forget: set the current limit! stepper.runSpeed()polls the motor and when a step is due, executes 1 step. This module is mainly used in robotics and in controlling dc and stepping motors. It is IN1, IN3, IN2, and IN4 for the stepper motor.
It is just an example. Now you can control the direction of Nema17 stepper motor using the potentiometer. In thesetup()section of the code we define the maximum speed in steps/second. The enable pins ENA and ENB jumpers are not removed. L298N Driver is one of the most wide-used hardware drivers for controlling stepper motors. Please keep all three jumpers on the L298N module in place (in case motor's power supply 12V). Pololu suggests a capacitor of 47 F or more (I used a 100 F capacitor). You can download the stepper motor library from here. I am planning to use this circuit to control a HF magnetic loop antenna's variable capacitor so it needs to be slow , small steps for accuracy and it must stop where AND when I want it to stop. Here a potentiometer will also be attached to control the direction of stepper motor. Motor is stopped
digitalWrite(8,HIGH); // DIR sens2 The STP (step) and DIR (direction) pin are connected to digital pin 3 and 2 respectively. You need to read the datasheet or manual to see the mapping between wire color and pin name. You will need asmall screwdriver, amultimeterto measure the reference voltage, and alligator test leads (optional but very handy). First of all, add the stepper motor library to your Arduino IDE. The rotation of the motor requires the magnetic field to make a single step. For this, we use the functionsetSpeed(). The L298N Motor driver IC is powerfully built with a big heat sink. All three inputs have internal 100 k pull-down resistors, so leaving the three microstep selection pins disconnected results in full-step mode. You can always increase it later if your motor/driver is missing steps. A stepper motor is a type of DC motor that works in discrete steps and used everywhere from a surveillance camera to sophisticated robots and machines. We also have a guide to control DC motor with L298N and Arduino: Open your Arduino IDE and go to File > New. So how do you control the speed, spinning direction, and number of revolutions? Therefore, there are more ways to do the wiring. It is a dual-channel H bridge motor driver which can be easily used to drive one single stepper motor. Make sure you specify the input pins in their correct sequence. EXEMPLE DE COMMANDE DUN NEMA17 en full micro-stepping. La torque ne fait que vibrer, elle ne tourne pas : sacez-vous pourquoi ? If you are using the driver with a breadboard, you can just use jumper wires to connect the selector pins to 5 V (i.e.  ce type de moteur est trs largement utilis dans les montage de machines CNC de hobby ( imprimantes 3D, fraiseuses CNC, graveuses laser, etc), mais peut avantageusement tre utilis pour bien dautres applications a base dARDUINO.
The shorter the delay, the higher the frequency, the faster the motor runs. The functionstepper.runToPostion()moves the motor (with acceleration/deceleration) to the target position and blocks until it is at the target position. In the loop I make use of a while loop in combination with thecurrentPosition()function. Make sure that your wiring follows the below table. After that define the no of steps for the NEMA 17. The stepper motor will automatically stop after reaching the desired position. The A4988 driver IC has a maximum current rating of 2 A per coil, but without a heat sink it can only supply about 1 A per coil before it starts to overheat. la commande : digitalWrite(8,LOW); met le signal de la broche DIR n8 a ltat bas soit dans le sens de rotation 1, puis la premire boucle for(int x = 0; x < 3200; x++) envoi 3200 fois une alternance de signaux haut et bas ( avec delay d1ms entre chaque alternance) sur la broche PULSE n 9 . The appropriate place to put your current meter is in series with one of your stepper motor coils. If you have multiple stepper motors connected, you can specify a different speed for each motor: In theloop()we first set the speed that we want the motor to run at. As we calculated, the no. It can be operated at a lower voltage, but torque will drop. The next step is to define the A4988 to Arduino connections and the motor interface type. * This example code is in the public domain, * Tutorial page: https://arduinogetstarted.com/tutorials/arduino-controls-stepper-motor-using-l298n-driver, // move motor one revolution, in clockwise direction, "Motor moving in anticlockwise direction". les NEMA 17 les plus courants ont 200 pas par tour et certains 400 pas et aucun jeu mcanique sur laxe.
digitalWrite(9,HIGH); Next set the speed for stepper motor using stepper.setSpeed function. stepper.step(10); } Stepper motors do not rotate they step, and NEMA17 motor has a step angle of 1.8 deg. digitalWrite(9,LOW); The L298N motor driver module consists of an L298N motor driver IC, 78M05 5V regulator, 5V jumper enable, power LED, heat sink, resistors, and capacitors all combined in an integrated circuit. voici le diagramme gnrique de branchement dun module POLOLU : sur ce schma , le cblage est en mode full step , il manque donc le branchement des broches MS1 MS2 MS3 qui permettent de piloter le moteur en micro-stepping, le tableau ci dessous donne le mode de branchement a appliquer suivant le micro-stepping souhait (high = mise au 5V): ainsi un NEMA 17 200 pas par tour pilot par un POLOLU A4988 en mode sixteenth step aura une prcision de 20016=3200 pas par tour soit pour un pas une prcision angulaire en rotation de 360/3200=0,11 degr. Note that I specify the name of the stepper motor (stepper), for which I want to define the maximum speed. Circuit diagram to controlNema 17 stepper motor with Arduinois given in the above image. }, OBSERVATOIRE et Autonomie: rcupration deau de pluie. digitalWrite(9,LOW); Also check various stepper motor related projects here, which not only incudes basic interfacing with various microcontrollers but also have robotics projects which involves stepper motor. Seulement si ces deux points sont vrifis on peut regarder le code. Step 180 and tell the library "stepper.moveTo(20)" will it go the short way (40 steps forward) or turn 160 steps back? For instance, driving a motor in quarter-step mode will give the 200-step-per-revolution motor 800 microsteps per revolution by using four different current levels. In the rest of the loop, we do exactly the same, just with a different speed and target position. ensuite une nouvelle boucle for fait faire 3200 pas au moteur , puis la boucle loop reprends depuis le debut apres une pause de 500ms.
- Hydrotools Pool Pump Model 71206 Manual
- Immigration Amnesty Program
- Gamakatsu Treble Hooks Size 10
- Delta Shopmaster Grinder
- Garage Door Spring Calculator
- Glamnetic Hello Kitty Glam
- Music Road Hotel Ovation Member
- Nordson Glue Nozzles Chart
- Peterbilt 379 Sleeper Fairing
- Wheelchair Accessible Italy


nema 17 stepper motor driver arduino
You must be concrete block molds for sale to post a comment.