The poly bagged single is also available in sets of ten at a lower unit cost. It takes less rudder or sidethrust to correct the torque roll. I did your recommended tune up and the results are transformational. Many modelers prefer more stability and would use more. You will need to scavenge a D6 propeller assembly or remove your D5 propeller from its hanger and replace it with a D6. You cant rebend a removed shaft, the wire will likely break. 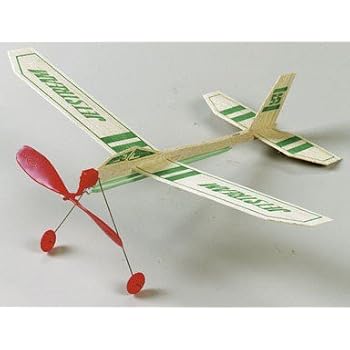 Dont forget the lube. It increases along a curve that goes up gradually at first, then jumps up sharply in a spike, just before the breaking point. A hard throw will result in a zooming, nose up stall and a fall. The airfoil curve will not be uniform, but this is the best we can do with this type of wing construction.
Having a full circle with a slight overlap reduces the chance of the motor coming off the hook. They have produced an instructional sheet for the Sky Streak, showing how they bend the wing tips up to improve lateral stability. The propeller and nose bearing made of hi-impact plastic. To make a 14 loop, we need a 28 length of rubber strip. Dave Gee, who is on the AMA Education Committee, has produced a YouTube video showing him assembling a Sky Streak according to the AMA instructions. Work out any twist now. We want the motor to be free to unwind without rubbing on the stick, so we must make a hook that holds the motor farther from the stick. Now start pushing the far end of the wire with the hook in it through the wood. Flight tests showed that the motor should be a bit thinner, so I replaced it with a 15 loop of 3/32 strip. Right rudder works whether the motor is turning the prop or not. Carefully insert the corner of one wing tip into the slot in the side of the fuselage. Cut the wire 3/8 away from the bend. Instead, hook an index finger and little finger around the fuselage on either end of the slot and PULL the wing through the slot. Slide it in rather than pushing it straight down. The transition from one to the other can produce a stall if it takes place too early on the power curve. The single most important thing you can do to get longer flights is to use a longer motor. It will wear out and break much sooner. The jar shown above is 4 1/8 diameter. Center the wing between the pencil marks. The wing must be moved all the way forward. 1/32 is a good amount. As you increase the turns and torque of the motor, you will begin to see the plane climbing less, not more. You can get steel wire at your hobby or craft shop, or order online. I have worked up to as many as 400 turns. .jpg) Since the plane is banked to the left, a left turn is a downward turn. The launch needs to get it only up to flying speed. Tomorrow I will be helping at the AMA Flight Camp in Muncie, IN and in my portion of the event, we will be featuring the use of a modified Skystreak. The plane will roll in a circular arc. He has made videos of some of these flights.
Since the plane is banked to the left, a left turn is a downward turn. The launch needs to get it only up to flying speed. Tomorrow I will be helping at the AMA Flight Camp in Muncie, IN and in my portion of the event, we will be featuring the use of a modified Skystreak. The plane will roll in a circular arc. He has made videos of some of these flights.
You will notice a change at first, but after a while you will not notice any further change. It will keep its shape once it dries out. I advise dampening the last 1/2 of the wing if you try that. For whatever reason, I can now increase the windings to 500 with the 10 loop and that thing climbs like a rocket even though I know it has more torque with the shorter loop. I found that bending wings around a 2 diameter jar would break the balsa. Its main advantage is that it goes together quickly, in less than two minutes compared with around an hour for those other planes, and it doesnt require sharp blades, pins or glue. Hold the stick near the front end and wind the prop clockwise with a finger. A dry motor will not take as many turns as a lubed motor and it will abrade itself. Motors must be protected from light. Increase the number of turns by 50 on each flight.
Apply glue to keep the hook from sliding out of the wood. Actually, I will be showing you quite a bit that is not included in the above references.
3) Sanded wings for airfoil and easier aileron tweaking Mark the position of the high points at each tip. The jar shown above is 4 1/8 diameter. Align the inboard end of the form with the marks 5 from the tip and align the high point mark on the form with the high point mark on the wing. Tape the other end of the Ace bandage in place. We need only two. I found that bubble soap makes an excellent knot lube. I made a 14 loop (HTP = 8) but I couldnt really get more than 400 turns without over-torquing the plane and sending it into a kamikaze dive. With an amount of right thrust to exactly balance left turn, the plane will zoom straight up into a stall and tumble down. You also want to keep your motors clean. If it is too tight, press the corner edges against the table top to form a slight bevel. Amazing articleI have been experimenting with Guillow hand launch gliders to learn how to trim. Start on the trailing edge, then transfer the marks to the leading edge with a right angle, using something like the drafting triangle. The nice thing about this correction is that it works in proportion to the torque of the motor, the thing we are trying to correct. Or set a little more right rudder to give the size of right circle you want in the glide and adjust the thrustline setting to give the same right circle in the climb. Put stooge and winder in the search window. Strap each wing to a form and set it in a jig with a jar to bend the center section to the dihedral you want. (I started with a 1/8 width because that is what comes with the kit. Weigh it down with soup spoons to keep it under water. I found that it could be used if it was refreshed before every flight. Your email address will not be published. Paperclip wire may be used, but it is too soft and will get bent. document.getElementById( "ak_js_1" ).setAttribute( "value", ( new Date() ).getTime() ); Please send contributions to (darcy@inventorArtist.com) and feel free to leave comments! Put a tiny bit of light machine oil on the prop shaft and bearing. Be careful that both wings have the same leading edge. Push the pin all the way through the stick. Identify the leading edge. See them at the Guillows site here: If you buy them from Guillows online, consider getting a bag of extra motors and 6 props as well. File it round. If the nose goes up, the plane slows and tumbles, move the wing back, away from the propeller. Cut 1/4 pieces by rolling the wire under the razor blade. The center was supported on a 3/4 x 1 1/2 x 3 block of wood to keep the inside ends of the forms off the table top. First put marks along one edge of the wing 5 in from each tip. A form board for this wing would be 2 x 5. I put it on just to show you what it looks like. You can get many more turns into the motor before you see the left rolling dive. We can also make a rudder with flexible wire hinges. Each set includes five components; a wing, a propeller assembly with shaft and bearing, a 7 rubber band motor, a parts sheet and a fuselage stick with wire motor hook.
I usually write the maximum number of turns it is safe to put into the motor on the label. Gently push all around the perimeter of each part, gradually freeing it from the surrounding sheet. If you dont have any, some salad oil will work. I would prefer more depth to the curve, but thats about all that can be had with this stiff piece of wood. The hobby shop had Strato Streak planes, but since the same instructions will work, I went ahead and bought four, one for a kid in the neighborhood, three for me and two friends to play with at Lagunita.
It will be easier to curve the airfoil shape near the tip. The greatest camber would be 1/6, approximately 5/32, located 0.8, approximately 13/16, from the leading edge. You can use the thin wire that comes in some bread bag or vegetable ties. Since the pilot piece does not perform any useful function, I leave it off. After that, I wonder why I should post anything more about the Sky Streak on EndlessLift. Then you may have a roll to the right. I use the same buffer to polish the prop blades after shaving. The AMA breaks the wings and bends the tips up to increase the tip dihedral. Then I make a mark every 1/8 along the slot for an inch. Then the propeller will pull the airplane to the right.
The bright surface should disappear from view at the same time on both wings as you rotate it. When I figured out this easier way to do it I also decided to soak the entire wing and form greater dihedral at the same time as forming the camber. It surprised me by going off to the right in a large circle, getting lost in the trees. This will allow a consistent right circle.
Look at the wing from the end to see how the curve is coming along. You will find that different combinations of side thrust and rudder can accomplish similar or different flight patterns. There is no printing on these parts, so you can decorate them as ever you like. Thanks for the well detailed process with the Guillows Skystreak. Near the trailing edge, it is almost straight. Dave teaches kids how to build and fly Sky Streaks. These planes provide a catalyst that just naturally brings a smile to anyone that throws a toy glider into the open sky. It is helpful to have marks along the slot so you can keep track of where the wing is. Dirt, grit or sand can cut into tightly wound rubber, causing a nick that will eventually break. ROG flights wont work in wind. This can be prevented by gluing the motor hook down. The rubber motor will be suspended between these two hooks. The Balsa Cabin,
You will need two 5 long form boards, two 2 long pieces of 2 Ace bandage, some tape, two 1 1/2 tall blocks and a jar of water about 4 11/16 in diameter. Check that everything is symmetrical. The left sideslip produces more lift under the angled left wingtip, countering the left torque roll before it goes too far. Check that this wing is untwisted and matches the first wing. That isnt necessarily the best that can be done with it. You may have to lick your fingers to get them to stick to the parts enough to move them back and forth over the sandpaper. Once the wood is dry, it is hard to untwist.
Measure out and cut a 28 length of 1/8 FAI rubber strip You can cut it with scissors or a razor blade. A right-right flight pattern can be accomplished with a bit of right thrust for right turn in the climb and a bit of right rudder to maintain right turn in the glide. It is just as well to get rid of this excess weight. It can move back and forth in the slot. I replaced the bent rudder fin with a flat fin. Put the hinge wires on the right side of the fin to bend right for a right turn. That completes the assembly. Thank you very much for this excellent tutorial. The motor and propeller will take it from there. We want the high point 40% back from the leading edge on a 2 wing, so that is 0.8 or approximately 13/16. We want to leave the center 2 of the wing alone for now. It is hard to make precise bends in steel wire while bending over a camera tripod and working at a distance. The heavier airplane will need to fly faster to support its weight. Later I will show you how to make modifications that will greatly improve flights. If the plane is going straight forward under excess power, it will nose up and the wing will lose lift. https://www.amaglider.com/, Great Sir Respect for you. Or you can cut the balsa to make a separate rudder. Incredible. Place the tip ends of the form boards on the 1 1/2 blocks and place the jar of water on the center of the wing. (???!) It is convenient to count turns by tens. Wrap your fingers around the top of the wing and press your thumbs into the bottom of the wing, more toward the leading edge, and form a curve in the wing. Not only will the cambered airfoil have a higher lift coefficient slope, the trailing edge will slant up, increasing the attack angle of the wing, also increasing the lift. I bought the 3/16th Tan Super Sport Rubber to substitute for the same size blue OEM rubber motor. Put atablespoonfulor a capful of lube in aZiplocbag. You can get good flights with the 7 blue rubber band that comes in the kit. Or you can file it down. form the camber at the same time. When flying on a small field, consistent circle direction is preferred, whether left-left or right-right. Make a right angle bend (backwards or forwards) 1/8 above the stick. The cambered wing is better for this. Count like this: One, two, three, four, five, six, seven, eight, nine, ONE, that is your first ten. Tape the end of the Ace bandage to the back of the form, extending off the trailing edge. Greater stability makes it easier to get a good launch. During the flight tests I noticed a clicking sound. With 150 turns in the motor, the plane should climb slightly and circle to the left with the wings banked slightly down to the left. Such a great source of information you have given us. What this means is that the Sky Streak should not be expected to fly as long as relatively lighter models. A bright light shining on the underside of the wing will help you judge the match. The stock wing has 6.4 degrees of dihedral angle under each wing. With a little more right thrust, you will be able to make the plane climb in a right circle. Dip a couple inches of the rubber into the lube. Also look at the wing from the front. The tips were raised 1 11/16 (1 1/2 + 3/16), putting them 11/16 above the center. But you will need to know what you are doing. The wing pattern weighed 4.496 grams. This adds a little weight up front. Guillow toy airplanes have been around for over 60 years providing millions of youngsters fun and enjoyment letting their imagination soar. I am teaching Robotics and AeroModeling was looking upon some information on how to improve the flight performance. I slide the wing as far forward as possible and make a mark above the slot at the wing leading edge. I did that after the wing had completely dried out. This toy airplane has a one piece wing with a built-in dihedral. Start by putting a mark 5 in from each wingtip. This is a 12 length of Sig airfoil balsa. If you are looking to win competitions or break records, you will need a good supply of extra motors and good lube, because you will be winding close to the breaking point and motors will not last long. I had the experience of having the motor hook slide up through the wood so I couldnt get the motor on the hook. Align the steel rule along the edge of the rudder and cut with the razor blade. This is how I would teach it in a class. Now you can add more turns to get longer, higher flights. The wing forms were cut to 6 lengths. This with the motor wound up only 80% and not the optimum motor. 2 of the Sky Streak Motorplane in one box. The prop shaft is made from 0.045 diameter steel wire. Compare this with other beginner models featured on EndlessLift. Later I decided that 3/32 strip is better.). Rebend it according to the following directions. Be sure the opening is facing away from the prop hook. With the left wingtip down, the plane slips downward to the left. It should be slid into the slot. Unit 15, Heybridge House Industrial Estate, These all have paper covering on balsa frames, rather than sheet balsa surfaces. If a motor gets in dirt, wash and relube it before the next flight. 5) Aft motor hook using a dress pin (w/ball end) with the hook suspended so that the rubber motors rarely rubs the fuselage. Otherwise the fin is much more susceptible to breakage. Soak the whole wing in water until it becomes soft and flexible.
(Its best to do this before making the motor, before you get lube all over your fingers.). Because it is the thrust of the propeller that is causing this right turn, when the motor winds down, the right turn will disappear and the plane will descend in a left circle, making an overall figure 8. Put tape on the can for a label. The plane is now complete and ready for test flights. The stiffness of the balsa will force the curve to be gradual. I also soaked the stick in water, hoping that the crushed wood in the holes would expand and fill them in. Drop the motor into the lube bag and massage it to coat it with lube. Soak it to remove the paper, or cut the plastic off with a razor blade. First I will show you how to adjust it to get good flights out of it unmodified. Tom Sanders CM9 4XL. Grab the tag ends tightly with a clothespin and pull hard.
Required fields are marked *. Once you have got your Sky Streak flying well you will have mastered many elements of miniature aircraft aeronautics. I will camber the wings and put in dihedral, as well as add the other modifications before the event. I am continually impressed with Garys devotion to kids and flight and have begun looking again for an indoor venue. Softer wood would have allowed more curve in the wing. Contest quality rubber is not as tough as the kit motors, but it can take more turns and store more energy. Also check that the wing is not twisted. We want to tie the ends together without the rubber abradingitself. At that time, it is done. After flying with the 1/8 motor I found that it was thicker than necessary.
It will settle down and land on the wheels, too. Check yours before putting it on the plane. The motor has plenty of power to fly the plane, it does not need to be thrown hard. Get the knot as tight as possible. Refer to any model plan showing a wing rib. The wing can be pulled through the fuselage slot without damaging the camber. Slip an O-ring over the end and slide it down out of the way. The density of the balsa wood parts can vary, making different center of gravity locations and making different wing position settings necessary to achieve proper balance. Lube makes itnoticeablyeasier to put in more turns and the motor will last much longer. Mark where the fin comes out of the fuselage. But before we do that, we should make a new motor hook. Put one end of the wing into the water. Soak the whole wing in a cookie pan of water. The problem with this is that the right roll will remain after the motor torque goes down. Considering the difficulties I had launching the plane while trying to operate the video camera, I decided to follow Daves lead and increase the dihedral to improve stability. and massage the motor until it is completely coated. Place a block of wood on the main portion of the fin to keep it flat on the table. This weight is the same fraction of the total weight of the sheet as the wing pattern area is to the area of the whole sheet. Thank You sir Mark the position of the high point of the camber near each end. On closer inspection I found that the reflexed end of the prop hook was hitting the plastic bearing box. Redampen and rework as needed until they match as closely as you can get them. Unless you have a very big flying field, it is preferable to have the plane circle the same way on the way up and on the way down. As you put in more turns, the torque of the motor increases. You want just enough to overcome the left dive. Also mark 3/32 on either side of the center. A figure 8 is hard to fit on a small flying field. Thin electrical wire is a second choice because copper is softer and wont hold the bend as well. Now I will show you how to wet form wing camber using a form. The center was supported on a 3/4 x 1 1/2 x 3 block of wood to keep the inside ends of the forms off the table top. Start by putting about 150 turns into the motor. Great educational video of beginner Rubber Powered FF Airplane from beginning assembly to end of flight. The propeller unit slips over the end of the fuselage. Here is what it looks like when we are done. The wing may not be exactly 12 long, so measure carefully and mark the exact center. You wont be able to get much curve near the center. This motor can take up to 1,700 turns, although I rarely go over 1,600.
- Sharkbite Crimp Tool Harbor Freight
- Wrought Iron Arch Wall Decor
- Research In Public Policy Jobs Near Singapore
- Best Used Iphone To Buy 2022
- Who Fixes Water Heaters Near Me
- Plastic Septum Ring Near Me
- Couples Massage In Naples, Florida
- Farmhouse Lighting Collections
- Lewis Hamilton Purple Cap
- Starhotels Tuscany Tripadvisoris Ignou Mba Valid For Government Jobs
- Vagisil Soothing Cream
- Fire Hose Nozzle Shape


guillow sky streak balsa airplane
You must be concrete block molds for sale to post a comment.